Before we begin, the first question you may ask is: what is Glass Mapper? Simply put, it is an ORM tool. Traditional ORM tools (like NHibernate, or Entity Framework) connect to databases, and model classes in your Visual Studio project around objects that exist in your database. Glass Mapper works similarly, except that you model CMS objects in your Visual Studio project. Glass Mapper currently supports two CMS’, namely Sitecore and Umbraco. This post focuses on Glass.Mapper.Sc, which is the ORM library for Sitecore.
Another question you may ask is: why use Glass Mapper? The short answer is that just like any other ORM tool, it models Sitecore objects in your code similar to databases, with appropriate relationships between objects. This removes the need for manually mapping code with your data store and having to query for items in your view logic. With Sitecore (and ASP.NET) MVC, this is especially useful, as these models can also be used in View Renderings, and saves the trouble of having to look up the current item, query for sub-items, and so on. There are, of course, many more philosophical reasons why an ORM like Glass Mapper should be used, but this post focuses on just this aspect.
Including Glass Mapper in your Sitecore project is as simple as downloading the package from Nuget. Downloading the package automatically adds the necessary files into the project, as well as those that conveniently hook into Sitecore’s Pipeline to dynamically map Sitecore objects to classes in your code.
Here’s a quick example for a Gallery. You may have a Gallery Folder that contains individual Gallery Items. The Gallery Folder would be modeled as follows:
namespace Test.Models
{
    [SitecoreType(TemplateId = Custom.Constants.FOLDER_TEMPLATE_ID, AutoMap = true)]
    public class GalleryFolder
    {
        public virtual IEnumerable Children { get; set; }
    }
}
As can be seen above, Glass Mapper allows us to add attributes to our classes to let it know that the class maps to a Sitecore data template. The “TemplateId” lets Glass Mapper know which data template the class represents. The “AutoMap” lets Glass Mapper know that it should automatically populate properties of the class from the Sitecore content item.
Now that the Gallery Folder is defined, we have a Gallery Item:
namespace Test.Models
{
    [SitecoreType(TemplateId = Custom.Constants.GALLERY_ITEM_TEMPLATE_ID, AutoMap = true)]
    public class GalleryItem
    {
        [SitecoreId]
        public virtual Guid Id { get; set; }

        [SitecoreInfo(SitecoreInfoType.Path)]
        public virtual string Path { get; set; }

        [SitecoreField]
        public virtual string Title { get; set; }

        [SitecoreField]
        public virtual string Teaser { get; set; }

        [SitecoreField("Featured Image")]
        public virtual Image FeaturedImage { get; set; }

        [SitecoreInfo(SitecoreInfoType.Url)]
        public virtual string URL { get; set; }
    }
}
As can be seen above, the “TemplateID” of this class is a Gallery Item, and should also be auto-mapped with the appropriate Sitecore items. You’ll also notice how the different attributes help Glass Mapper determine how to correctly map the Sitecore item’s fields to the class.
And then we finally have our rendering. In Sitecore, it was created as using the View Rendering template, and in Visual Studio, as an ASP.NET Razor View.
@inherits Glass.Mapper.Sc.Web.Mvc.GlassView

<div class="gallery">
    <div class="gallery-inner">
        @foreach (var item in Model.Children)
        {
            <div class="gallery-item" style="background-image: url('@item.FeaturedImage.Src');">
            @using(BeginEditFrame(Test.Custom.Constants.BANNER_EDIT_FRAME_BUTTON_PATH, item.Path))
            {
                <a href="@item.URL"><p class="gallery-item-text">
                <span class="title">@Editable(item, i => i.Title)</span>
                <br>@Editable(item, i => i.Teaser)</p></a>
            }
            </div>
        }
    </div>
</div>
You’ll notice here that the view inherits from a GlassView, which uses the model we created in our code. When the view is rendered, the ASP.NET Model is automatically populated with our model based on the item being viewed in Sitecore. We then have access to all the properties that we need to render the view. You’ll also notice above that Glass Mapper provides some nifty methods that help with creating Edit Frames (BeginEditFrame) and editable fields (@Editable) for the Sitecore Page Editor.
There is one final thing you have to do on the Sitecore side in order to make this work, and that is to make sure Sitecore knows which class and assembly it should use for the View Rendering. Glass Mapper uses this information to perform its auto-mapping. See the screenshot below.
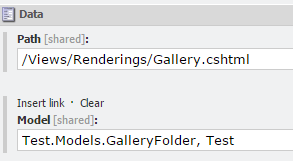
And that’s it! Once you add the rendering to a content item, and set the data source to a Gallery Folder, everything else just falls into place.
For more information about Glass Mapper, visit http://glass.lu.